In CapacitorJS, you can easily generate the icons and splash for your Android application.
You cannot deny that an eye-catching icon is one of the best ways to make your app stand out from other apps. You can easily generate app icons for native applications using the Image Asset Studio tool, which lets you use material icons, custom images, and text strings to create them. In CapacitorJS, you can automatically generate the resized version of your app icon to match every image needed.
My goal in this article is to help you easily create the icon and splash resources for the Android version of your CapacitorJS application.
1. Create image resources
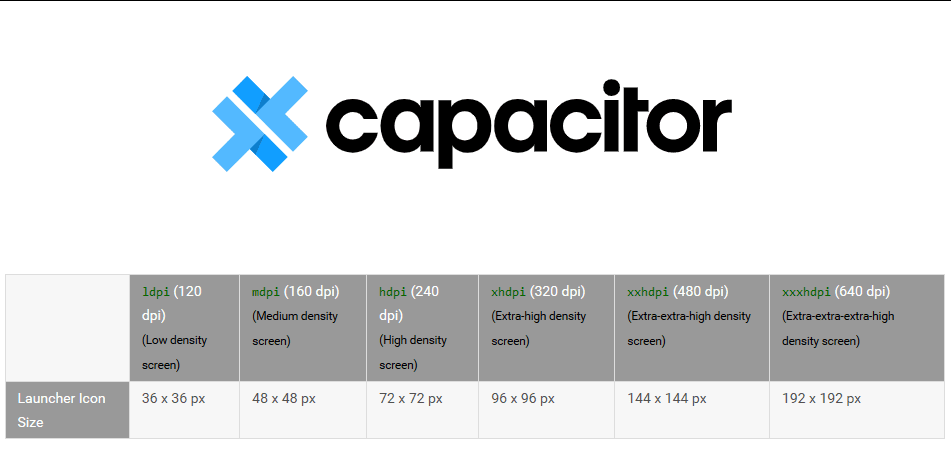
You need at least 4 images (you need to create them and they will contain the logo of your application) in order to generate valid icons and splashscreens (mipmap and drawable) based on the Android API 26:
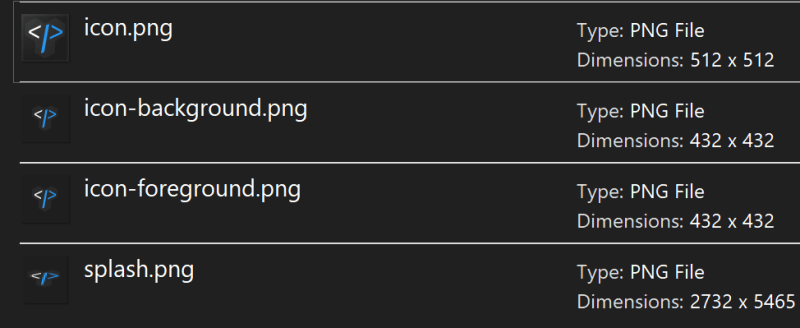
icon.png: For icons, the image source should be at least 1024x1024px and located at resources/icon.png.splash.png: To achieve best results, splash screen artwork should roughly fit inside a square (2732x2732px) at the center.android/icon-background.png: this file is exclusive of the Android Platform (check Adaptive Icons). A 108 x 108 dp image (xxxhdpi: 432 x 432 pixels) is required.android/icon-foreground.png: this file is exclusive of the Android Platform (check Adaptive Icons). A 108 x 108 dp image (xxxhdpi: 432 x 432 pixels) is required.
When you use icon-background and icon-foreground, you only get the inner 72 x 72 pixels of the icon within the masked viewport. A parallax or pulsing effect is created on each of the four sides using the outer 18 dp. Because it should have the padding mentioned, the icon in the image will be smaller.
The following files need to be located in the root directory of your CapacitorJS project inside resources directory:
resources/
├── android/
│   ├── icon-background.png
│   └── icon-foreground.png
├── icon.png
└── splashscreen.png
For my case, I need the following images with the following dimensions:
For Icon Adaptive Design, a background icon-background and foreground icon-foreground images are required. Without these, in newer versions of Android such as Android Pie, the icon will be empty and you will get an error message in your terminal when generating them with cordova-res:
Generated 18 resources for Android
WARN:   Error occurred while copying resources/android/icon/mdpi-foreground.png
WARN:   Error occurred while copying resources/android/icon/mdpi-background.png
WARN:   Error occurred while copying resources/android/icon/hdpi-foreground.png
WARN:   Error occurred while copying resources/android/icon/hdpi-background.png
WARN:   Error occurred while copying resources/android/icon/xhdpi-foreground.png
WARN:   Error occurred while copying resources/android/icon/xhdpi-background.png
WARN:   Error occurred while copying resources/android/icon/xxhdpi-foreground.png
WARN:   Error occurred while copying resources/android/icon/xxhdpi-background.png
WARN:   Error occurred while copying resources/android/icon/xxxhdpi-foreground.png
WARN:   Error occurred while copying resources/android/icon/xxxhdpi-background.png
2. Adding icons to your Android platform
It is necessary to use the cordova-res tool to generate the proper resized Android icons (hdpi, xhdpi, xxhdpi). This tool will crop and resize JPEG and PNG source images to generate icons and splash screens for modern iOS, Android, and Windows. cordova-res was designed to work with Cordova, but Capacitor and other native runtimes are also supported. Use the following command to install this module globally on your computer:
npm install -g cordova-resAll that’s left to do is generate all the images and copy them into the native projects by running the following command.
cordova-res android --skip-config --copyThe following output will be generated:
Generated 24 resources for Android
Copied 31 resource items to Android
Under the resources directory, the following files will be generated:
resources/
├── android/
│   ├── icon/
│   │   ├── drawable-hdpi-icon.png
│   │   ├── drawable-ldpi-icon.png
│   │   ├── drawable-mdpi-icon.png
│   │   ├── drawable-xhdpi-icon.png
│   │   ├── drawable-xxhdpi-icon.png
│   │   ├── drawable-xxxhdpi-icon.png
│   │   ├── hdpi-background.png
│   │   ├── hdpi-foreground.png
│   │   ├── ldpi-background.png
│   │   ├── ldpi-foreground.png
│   │   ├── mdpi-background.png
│   │   ├── mdpi-foreground.png
│   │   ├── xhdpi-background.png
│   │   ├── xhdpi-foreground.png
│   │   ├── xxhdpi-background.png
│   │   ├── xxhdpi-foreground.png
│   │   ├── xxxhdpi-background.png
│   │   └── xxxhdpi-foreground.png
│   ├── icon-background.png
│   ├── icon-foreground.png
│   └── splash/
│       ├── drawable-land-hdpi-screen.png
│       ├── drawable-land-ldpi-screen.png
│       ├── drawable-land-mdpi-screen.png
│       ├── drawable-land-xhdpi-screen.png
│       ├── drawable-land-xxhdpi-screen.png
│       ├── drawable-land-xxxhdpi-screen.png
│       ├── drawable-port-hdpi-screen.png
│       ├── drawable-port-ldpi-screen.png
│       ├── drawable-port-mdpi-screen.png
│       ├── drawable-port-xhdpi-screen.png
│       ├── drawable-port-xxhdpi-screen.png
│       └── drawable-port-xxxhdpi-screen.png
├── icon.png
└── splash.png
Don’t forget to synchronize your application after you generate the images:
npx cap syncAs you launch your Android application on your device or emulator, they will be used respectively.